www.youtube.com/watch?v=HLnMuEZpDwU

목표
자바의 애노테이션에 대해 학습하세요.
학습할 것 (필수)
- 애노테이션 정의하는 방법
- @retention
- @target
- @documented
- 애노테이션 프로세서
먼저 재미삼아 Annotation 발음에 대해서 이야기를 해주셨네요~
어노테이션, 애너테이션, 애노테이션 다 상관없다고 합니다 :)
제 생각도 같아요. 중요한 건 이게 아니니깐요 ~
Annotation
- 의미 그대로 풀이한다면 주석입니다. 하지만 일반적으로 알던 주석 ( // ) 과는 다르게 @ 기호를 사용합니다.
- 소스 코드에 추가할 수 있고 메타데이터의 일종입니다.
Annotation 용도
자바는 선언적 프로그래밍 방식입니다. Annotation이 없었을 땐 xml에 각 클래스를 명시하였습니다. 하지만 서비스 규모가 커지면서 관리하기가 힘든 단점이 있었습니다.
- Anotation은 직접 클래스에 명시할 수 있게 되었고 덕분에 쉽게 관리할 수 있게 되었습니다.
- Annotation의 AOP를 쉽게 작성할 수 있게되었습니다.
- Reflection을 이용하여 특정 클래스를 주입할 수도 있습니다.
Annotation 정의하는 방법
public @interface SimpleYong {
}
class를 명시하는 란에 @interface를 사용하면 쉽게 annotation을 생성할 수 있습니다.
Annotation에는 중요한 개념이 몇가지 존재합니다. 자세히 알아보겠습니다.
@Retention
선언된 Annotation이 어느 레벨까지 남아있을지에 대한 정책을 정합니다.
RetentionPolicy는 3가지가 있습니다. 이 개념을 이해하기 위해선 1장에서 학습한 내용을 이해해야합니다.
SOURCE -> CLASS -> RUNTIME 순으로 이해하면 됩니다. 하나씩 살펴보겠습니다.
RetentionPolicy.SOURCE
의미 그대로 Source 레벨에서만 남아있다는 의미입니다.
@Target(ElementType.METHOD)
@Retention(RetentionPolicy.SOURCE)  // source
public @interface Override {
}
public class Simple {
@Override // 명시
public String toString() {
return super.toString();
}
}위 코드인 Override Annotation을 보면 소스 레벨에서만 의미가 있습니다. 컴파일하면 바이트 코드에 남아있을 필요가 없습니다.
RetentionPolicy.CLASS
해당 Annotation은 Class 레벨까지 남아있다라는 의미입니다.
ClassLoader가 바이트코드를 읽어들여 메모리에 적재하기 전까지 남아있습니다.
@Retention(RetentionPolicy.CLASS)
public @interface SimpleYong {
}
RetentionPolicy.RUNTIME
Annotation이 Runtime까지 남아있다라는 의미입니다.
ClassLoader가 바이트코드를 읽어들여 메모리에 적재 후에도 남아있습니다. 즉 Runtime 중에 Reflection을 이용하여 Class의 정보를 꺼낼 수 있습니다. ( Reflection )
Reflection
Reflection이란?
ClassLoader가 읽어들인 기반으로 메모리에 들어온 정보를 읽습니다.
Reflection을 통해서 RUNTIME Annotation을 읽어들이는 예제를 작성해보겠습니다.
@Service
@SimpleYong
public class SimpleService {
}
@Retention(RetentionPolicy.RUNTIME)
public @interface SimpleYong {
}public class Simple {
public static void main(String[] args) {
AnnotatedType[] annotatedInterfaces = SimpleService.class.getAnnotatedInterfaces();
for (AnnotatedType annotatedInterface : annotatedInterfaces) {
System.out.println(annotatedInterface);
}
}
}@Inherited
하위 클래스 모두 Annotation을 적용하기 위한 설계를 할 때 쓰이는 Annotation 입니다.
@Documented
@Retention(RetentionPolicy.RUNTIME)
@Target(ElementType.ANNOTATION_TYPE)
public @interface Inherited {
}
예시로 살펴보겠습니다. 먼저 Inherited Annotation을 달지 않고 Reflection으로 Annotation을 조회해보겠습니다.
@Target(ElementType.TYPE)
@Retention(RetentionPolicy.RUNTIME)
public @interface SimpleYong {
}@SimpleYong
public class SimpleService {
}public class SimpleDetailService extends SimpleService {
}public class Simple {
public static void main(String[] args) {
Annotation[] annotations = SimpleDetailService.class.getAnnotations();
for (Annotation annotation : annotations) {
System.out.println(annotation);
}
}
}위 코드의 결과 값은 아무것도 나오지 않습니다.
이번엔 @Inherited를 붙히고 결과값을 살펴보면 나오는 것을 확인할 수 있습니다.
@Inherited
@Target(ElementType.TYPE)
@Retention(RetentionPolicy.RUNTIME)
public @interface SimpleYong {
}// result
@com.example.practice.annotations.SimpleYong()
@Target
Annotation이 적용가능한 대상을 정합니다.
@Target(ElementType.METHOD)
@Retention(RetentionPolicy.RUNTIME)
public @interface SimpleYong {
}
위 Annotation은 Method에만 적용이 가능합니다. 만약 Method가 아닌 Class에 Annotation을 단다면 컴파일 에러가 발생합니다.

종류
적용 가능한 ElementType은 아래와 같습니다.
public enum ElementType {
    /** Class, interface (including annotation type), or enum declaration */
    TYPE,

    /** Field declaration (includes enum constants) */
    FIELD,

    /** Method declaration */
    METHOD,

    /** Formal parameter declaration */
    PARAMETER,

    /** Constructor declaration */
    CONSTRUCTOR,

    /** Local variable declaration */
    LOCAL_VARIABLE,

    /** Annotation type declaration */
    ANNOTATION_TYPE,

    /** Package declaration */
    PACKAGE,

    /**
     * Type parameter declaration
     *
     * @since 1.8
     */
    TYPE_PARAMETER,

    /**
     * Use of a type
     *
     * @since 1.8
     */
    TYPE_USE
}
선언 방법
@Target(ElementType.METHOD)
@Retention(RetentionPolicy.RUNTIME)
public @interface SimpleYong {
}
@Target({ElementType.METHOD, ElementType.CONSTRUCTOR})
@Retention(RetentionPolicy.RUNTIME)
public @interface SimpleYong {
}한개, N개 모두 설정할 수 있습니다.
@Documented
Annotation 정보가 javadoc으로 작성된 문서에 포함됩니다.

Locale : ko_KR
Other command line arguments : -encoding UTF-8 -charset UTF-8 -docencoding UTF-8
먼저 Annotation을 달지 않고 javadoc을 통해 문서를 생성해보겠습니다.
@Inherited
@Target(ElementType.METHOD)
@Retention(RetentionPolicy.RUNTIME)
public @interface SimpleMethodYong {
}

Annotation을 달고 다시 생성해보겠습니다.
@Inherited
@Documented
@Target(ElementType.METHOD)
@Retention(RetentionPolicy.RUNTIME)
public @interface SimpleMethodYong {
}
결과값을 확인해보면 @Documented를 달면 Javadoc 문서에서 보이는 것을 알 수 있습니다.
애노테이션 프로세서
먼저 ServiceLoader가 무엇인지 살펴보자!
ServiceLoader란?
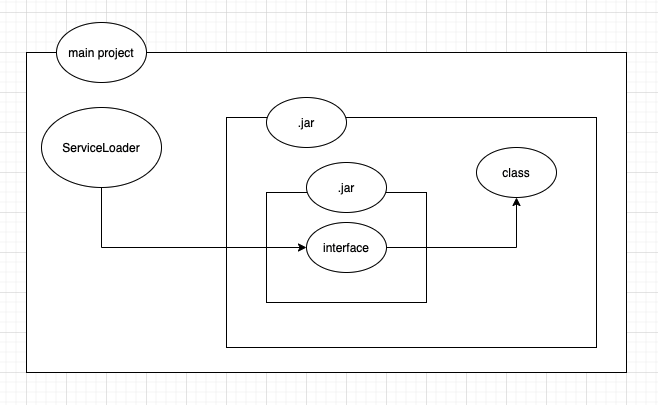
interface의 구현체를 지정하지 않고 jar file만 변경하면 작동하게 할 수 있습니다. 이 방법을 ServiceLoader라고 합니다.
구현체를 어떻게 찾을 것인가?
인터페이스를 사용하는 구현체의 resources폴더에 META-INF/services 만들고 안에 인터페이스의 풀 패키지 경로로 파일을 만들어줍니다. 그리고 파일 내용으로는 구현체의 풀패키지 경로를 작성합니다.
jar1 - interface
public interface DefaultService {
    String defaults();
}
jar2 - class
public class MyDefaultService implements DefaultService {

    @Override
    public String defaults() {
        return "my default";
    }
}
Main Project
public class MyDefault {
    public static void main(String[] args) {
        ServiceLoader<DefaultService> defaultServices = ServiceLoader.load(DefaultService.class);
        for (DefaultService defaultService : defaultServices) {
            System.out.println(defaultService.defaults());
        }
    }
}
Main Project는 jar2의 디펜던시 추가되어있고 jar2는 jar1 디펜던시가 추가되어있습니다.
만약에 jar가 여러개라면 for문에서 모두 읽어와 실행합니다.
Spring에서는 어떻게 사용하고 있을까?
spring-boot-autoconfigure-2.4.0.jar 파일을 살펴보면 ServiceLoader와 동일한 설정이 되어있는 것을 알 수 있습니다.

어노테이션 프로세서란?
어노테이션 프로세서는 필수적으로 어노테이션 프로세서를 구현한 구현체가 있어야합니다. AbstracProcessor를 상속받아 구현합니다.
위에서 설명한 ServiceLoader 또한 어노테이션 프로세서이고 다른 대표적인 예로는 Lombok이 있습니다.
import lombok.AllArgsConstructor;
import lombok.Getter;
import lombok.NoArgsConstructor;
import lombok.Setter;

@Getter @Setter @NoArgsConstructor @AllArgsConstructor
public class Study {
    private String name;
    private Integer level;
}
간단하게 Annotation만 추가하였습니다. build를 하고 class 파일을 살펴보겠습니다.
//
// Source code recreated from a .class file by IntelliJ IDEA
// (powered by FernFlower decompiler)
//

package com.example.practice.enums;

public class Study {
    private String name;
    private Integer level;

    public String getName() {
        return this.name;
    }

    public Integer getLevel() {
        return this.level;
    }

    public void setName(final String name) {
        this.name = name;
    }

    public void setLevel(final Integer level) {
        this.level = level;
    }

    public Study() {
    }

    public Study(final String name, final Integer level) {
        this.name = name;
        this.level = level;
    }
}
롬복의 어노테이션을 사용하여 class파일의 메서드를 생성한 것을 확인할 수 있습니다.
'Develop > java' 카테고리의 다른 글
| [백기선님의 자바 라이브 스터디] 5주차 - 클래스 (0) | 2021.01.04 |
|---|---|
| [Java] if, else 에서 탈출해보자! interface활용 (5) | 2020.12.03 |
| [Optional] Java 유용한 Null 처리 (0) | 2020.12.01 |
| [ObjectMapper] Convert!! snake to camel, camel to snake (0) | 2020.11.19 |